Description of ToDo example
1. Introduction
As part of comparison of Smalltak web frameworks Hannes Hirzel came out with idea to prepare a ToDo web app example. Here it is, an Aida one and here is a short description of most important code.
2. Installation
Load Aida/Web and ToDo code in a fresh Pharo (like 1.2 or 1.3) with a following script:
Gofer new
    squeaksource: 'MetacelloRepository';
    package: 'ConfigurationOfAida';
    load.

(Smalltalk at: #ConfigurationOfAida) load.

Gofer new
    squeaksource: 'AidaAddons';
    package: 'AidaToDoExample';
    load.
Then open http://localhost:8888/todo . You should get a default empty list of tasks for user Guest, which is there until you Sign in. For convenience it it possible to work on Guest's ToDo list too, without signing in.

3. Description of classes
Example is in Aida MVC fashion composed of model and presentation classes in two categories and two extensions of existing Aida classes. Here is a short description of each class:
| AidaToDoExample-Model |
ToDoList |
Holds tasks to do, one by each user on the site
|
| |
ToDoTask |
Describes a task to be completed. |
| AidaToDoExample-App |
ToDoRedirectionApp |
Just redirects to the currently logged-in user's todo list. |
| |
ToDoListApp |
A presentation class for todo list of logged-in user. |
| |
ToDoTaskWidget |
For adding new task or editing existing one. It also provides a popup to manage a "membership", that is, additional users assigned to that task. |
| |
ToDoLoginWidget |
For a login popup with ajaxified fields to validate username and password entries immediately. |
| *Extensions |
DefaultWebStyle |
CSS for this ToDo is added to default CSS in method #css59ToDoExample |
| |
WebUser |
Accessor/setter #todoList added to store a ToDoList of that user |
4. Setup
Setup is done automatically after initialization in ToDoRedirectApp class #initialize, but let us see the main steps. First the class ToDoRedirectApp is registered at the Url /todo:
AIDASite default register: ToDoRedirectApp onUrl: '/todo'
This is registration of so called standalone App, that is, an App which doesn't represent some domain object (its instance variable #observee is nil).
After we open this /todo Url in browser, by convention the #viewMain method of ToDoRedirectApp is called:
ToDoRediretApp >> viewMain
    self redirectTo: self user todoList
This method just redirects the request to the ToDo list of currently logged-in user. Note that in this case we point to a domain object and not the App. After redirect the ToDoList domain object will then find or create an appropriate representation App object, by convention an instance of ToDoListApp. This closes the first "traditional" way of Aida apps as shown in tutorial, where we are using so called "graph like" control flow where each page represent some view of domain object and pages are always recreated, then navigation between domain objects and their views.
Now we are on main view of the ToDo list. And we will stay here for a while without reloading a page. This is an example of so called Single Page web application, where we will work with help of Ajax updating just parts of a page when necessary. Here starts also so called "tree-like" control flow in Aida, with extensive use of stackable modal popup windows, from a simple delete confirmation dialog on.
5. Basic CRUD cycle
After redirect we are on the main view of user's ToDo list as shown on the first picture above. Let we look at the method composing that page:
ToDoListApp >> viewMain

    | e taskList |
    self ensureLibraries.
    self title: (self user isGuest ifTrue: ['Guest'] ifFalse: ['My']), ' ToDo list'.

    e := WebElement newDiv class: #'todo-list'. e table width: 1. "100%"
    e cell colspan: 2; addTextH1: self title. e newRow.

    taskList := self taskListElement.
    e cell add: (self openLinkAndUpdate: taskList); addSpace.
    e newCell align: #right; add: self logonElement.
    e newRow. e cell colspan: 2; add: taskList.

    self add: e.

    self observee onChangeDo: [taskList update] on: taskList app: self.
First method ensures that all needed JavaScript libraries are loaded. We'll need them for calendar date picker later in popups:
ensureLibraries
    "for date input in task open/edit popup"
    self style ensureJsAndCssForCalendarInHeader.
Then we set a title of that page. Creating a main DIV element for our ToDo list follows, setting to CSS class .todo-list and its main table width is set to be 100%. Yes, tables are used for positioning things on the page too. CSS is otherwise defined in method #css59ToDoExample, which extends the DefaultWebStyle.
e := WebElement newDiv class: #'todo-list'. e table width: 1. "100%"
How tables are very simply used in Aida we can see from next line, where the title is added over two cells and then new row is open:
e cell colspan: 2; addTextH1: self title. e newRow.
The next code starts with preparing a task list element, which will be added to main element after the open and login links are added:
taskList := self taskListElement.
e cell add: (self openLinkAndUpdate: taskList); addSpace.
e newCell align: #right; add: self logonElement.
e newRow. e cell colspan: 2; add: taskList.
Task list element needs to be updated after new task is added and we need it to have it as an argument to that open link. More later, same about Sign in link. Next line then adds main element to the current (main) view page:
self add: e.
Last line is most interesting, because it contains the most powerful new Aida feature, the so called e update, that is, every element can be updated on the web page simply by calling #update on it! And not only on our webpage, but on any currently open webpage at other users. This is the main feature of so called real-time web: getting updates of information immediately after info is changed. In our case: if other users have their task lists open, they are updated after our task list update, if this change concerns them of course. That is, if we assign them as 'members' of our task.
self observee onChangeDo: [taskList update] on: taskList app: self.
Let we now start with CRUD (Create Retrieve Update Delete) cycle as an example, how simple you can implement such important pattern in Aida.
5.1 Create
Opening a new task is possible with clicking a link on main page, by above mentioned method #openLinkAndUpdate:, called from ToDoListApp>>viewMain :
ToDoListApp >> openLinkAndUpdate: aTaskElement
    | e |
    e := WebElement new.
    (e addNilLinkText: 'Open new task')
        onClickPopup:
            (ToDoTaskWidget newForAdd
                onAnswerDo: [:newTask |
                    self observee addTask: newTask.
                    aTaskElement update]).
    ^e
This element holds a link to open a new task, which is so called 'nil' link, that is, it doesn't point anywhere but is here just to trigger a click event. Link is immediately added to main element, then onClickPopup: event handler is set to popup a ToDoTaskWidget:
(e addNilLinkText: 'Open new task')
    onClickPopup:
        (ToDoTaskWidget newForAdd
        ....
Widget in Aida is a component of webpage in a separate class, contrary to an usual web element, which is always generated in some method of your App class (and also Widget). Widgets has also its own standalone form support. And because you can compose Widgets out of other widget in a hierarchy, you have also a hierarchy of forms. Form hierarchy is otherwise not supported in HTML, so submitting that form is always done by Ajax.
Widgets can on close also return some value on which we can add a handler. In our case a ToDoTaskWidget will return a new task, which will be added to tasks, then it will update a task list to reflect a new change:
 (ToDoTaskWidget newForAdd
      onAnswerDo: [:newTask |
          self observee addTask: newTask.
          aTaskElement update]).
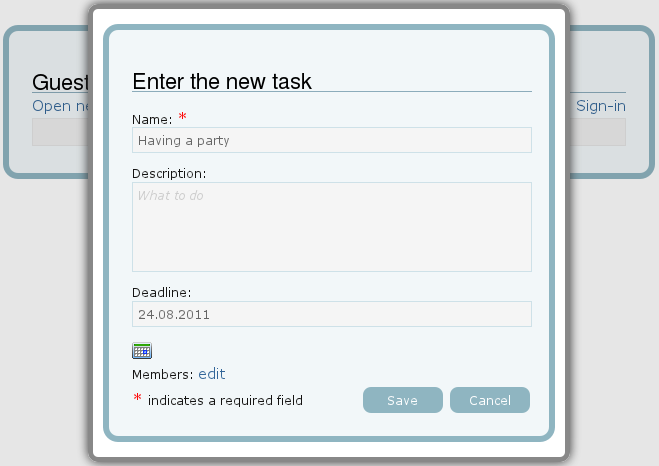
This is how this popup looks like when clicked and partly filled:

Let we now look at the code of this widget. Main method in every widget is #build :
ToDoTaskWidget >> build
    self clear.
    self inAddMode ifTrue: [self newTask].
    self add: self editElement.
This widget is used for both adding new task and editing an existing one. In case of new task we set a new instance of ToDoTask in widget's instance variable. Le we see, how edit element look like:
ToDoTaskWidget >> editElement

    | e mmbrs |
    e := WebElement newDiv class: #'todo-form'.
    e table width: 1 "100". e cell colspan: 2.
    e cell add: self titleElement; addBreak.

    (e cell addText: 'Name: ') class: #label. (e cell addText: '*') class: #required.
    (e cell addInputFieldAspect: #name for: self task size: 20)
        placeHolder: 'Short task name';
        required;
        onChangePost.

    (e cell addText: 'Description: ') class: #label.
    (e cell addTextAreaAspect: #description for: self task size: 20@2)
        placeHolder: 'What to do';
        onChangePost.

    (e cell addText: 'Deadline: ') class: #label; addBreak.
    (e cell addDateInputFieldAspect: #deadline for: self task)
        class: #datefield;
        onChangePost.

    e newRow. (e cell addText: 'Members: ') class: #label.
    mmbrs := self membersElement.
    (e cell addNilLinkText: 'edit')
        onClickPopup: self membersEditPopup thenUpdate: mmbrs.
    e cell addBreak; add: mmbrs. e newRow.

    (e cell addText: '*') class: #required. e cell addTextSmall: ' indicates a required field'.
    e newCell width: 0.5 "50%"; align: #right; add: self formButtons.
    ^e
5.2 Retrieve
After a task is added, it will be shown not only on our task list but also on lists of all others, which are assigned as members of that task. This look like:

5.3 Update
By clicking the edit link on the list a task widget is popped up again. This time in edit mode. It is mostly the same as we saw in section 5.1 Create.
What is interesting to see is the toggle link complete/completed. By clicking on this link we immediately complete the task and link became 'completed' and gray. Clicking again will undo completition:

Such toggle is very simple to do with new 'e update' feature in Aida:
ToDoListApp >> completeLinkFor: aTask

    | e |
    e := WebElement newSpan.

    aTask isPending ifTrue:
        [(e addNilLinkText: 'complete')
            class: #'todo-actionlink';
            title: 'Click to complete this task';
            onClickDo:
                [aTask setCompleted.
                e updateWith: aTask] ].

    aTask isCompleted ifTrue:
        [(e addNilLinkText: 'completed')
            class: #'todo-actionlink';
            style: 'color: lightgray';
            title: 'Click to uncomplete it';
            onClickDo:
                [aTask setPending.
                e updateWith: aTask] ].
    ^e
To simplify it is just this code:
       (e addNilLinkText: 'complete')
            onClickDo:
                [aTask setCompleted.
                e updateWith: aTask].
On click to the status link we complete the task then simply update this status element again. But this time with an argument, because element creation method expects argument too: 'e updateWith: aTask'.
5.4 Delete
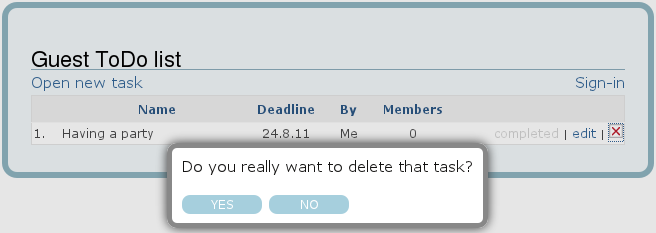
Let we finish the CRUD cycle with a delete action of a task. By clicking the X icon on the right of the task list a delete confirmation dialog is popped up:

Aida provides an already prepared widget for such confirmation: WebDialog. Here is the code for a whole delete together with confirmation (as part of action links for status, edit and delete):
ToDoListApp >> actionLinksFor: aTask on: aListElement

    | e |
    e := WebElement new.

    e add: (self completeLinkFor: aTask).

    (e addTextSmall: ' | '; addNilLinkText: 'edit')
        class: #'todo-actionlink';
        onClickPopup: (ToDoTaskWidget newForEdit: aTask) thenUpdate: aListElement.

    (e addTextSmall: ' | '; addLinkTo: '#' png: #buttonDeletePng title: 'Delete this task')
        onClickPopup:
            (WebDialog newConfirm
                text: 'Do you really want to delete that task?';
                ifTrue:
                    [self observee deleteTask: aTask.
                    aListElement update]).
    ^e
See the last part, where we add an icon as nil link (that's why '#'), then a click event handler to popup a dialog is specified. This dialog returns true or false depending on what button is pressed, so we can add ifTrue or ifFalse blocks to act on answer accordingly:
  WebDialog newConfirm
       ifTrue:
           [self observee deleteTask: aTask.
           aListElement update].
After task is deleted we update a list again by simply calling its #update method.
6. Form validation
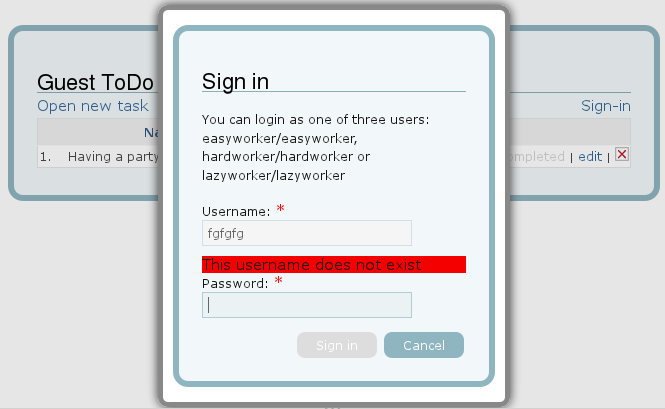
One of major Aida features is also an ajaxified form validation, which you can see at work on login popup widget:

The code of this widget looks like:
ToDoLoginWidget >> build
    self clear.
    self username: ''; password: ''.
    self add: self loginElement.
Let we look at the #loginElement method:
ToDoLoginWidget >> loginElement

    | e ufield pfield |
    e := WebElement newDiv class: #('todo-form' 'todo-nowide').
    e table width: 1 "100".
    e cell colspan: 2; addTextH1: 'Sign in'; addBreak.
    e cell add: self instructionsElement; addBreak; addBreak.

    (e cell addText: 'Username: ') class: #label. (e cell addText: '*') class: #required.
    ufield := (e cell addInputFieldAspect: #username for: self)
        required;
        validIfTrue:
           [:value | value isEmpty or: [self site securityManager existUserNamed: value] ];
        errorText: 'This username does not exist';
        onChangePost.
    e cell add: ufield errorElement.  "which will show error if any"

    (e cell addText: 'Password: ') class: #label. (e cell addText: '*') class: #required.
    pfield := (e cell addInputFieldAspect: #password for: self)
        required;
        validIfTrue: [:value | value isEmpty or:
            [self site securityManager existUserNamed: self username withPassword: value]] ;
        errorText: 'Password incorrect';
        onChangePost.
    e cell add: pfield errorElement.

    e newRow. e newCell width: 0.7 "70%"; align: #right; add: self buttonsElement.
    ^e
Le we see how the realitime validation of username field is done. Just this code snippet looks like:
    (e cell addText: 'Username: ') class: #label. (e cell addText: '*') class: #required.

    ufield := (e cell addInputFieldAspect: #username for: self)
        required;
        validIfTrue:
          [:value | value isEmpty or: [self site securityManager existUserNamed: value] ];
        errorText: 'This username does not exist';
        onChangePost.

    e cell add: ufield errorElement.  "which will show error if any"
We request the username input field to be required (whore form is not complete until this field is entered) then we declare a condition for the field to be valid (user with that username must exist). Next we set up an error text to be shown in case of validation error, and set the immediate posting after this field is entered or changed.
Last line adds the default error element which is empty until some validation error arises, as you can see in above picture. This is all done immediately, in real-time, after you type data into fields and go to the next field. Ajax way therefore, but because of seamless Ajax integration you don't see any Ajax specifics anywhere.
Even more, the Sign-in button is inactive/grayed-out until a complete form is valid and all required fields are entered. As seen on above image. It become active immediately after the form becomes complete. Let we see how we set up those buttons:
ToDoLoginApp >> buttonsElement
    | e |
    e := WebElement new.
    (e addButtonText: 'Sign in') class: #button;
        disableUntilValid;
        onSubmitDo:
            [self login.
            self page redirectTo: self user todoList];
        onSubmitClose.
    (e addButtonText: 'Cancel') class: #button;
        onSubmitClose.
    ^e
Just saying to the button to #disableUntilValid is enough to become auto active at the right time. We also set up the submit action (to login and redirect to a a task list of just logged in user), and that a login popup should be then closed.